Monday 25 November 2013

"Tis the Season... for Christmas Cards!

Christmas is by far one of my favorite holidays.  It's hard to resist any holiday that has such awesome decorations and yummy food.  Even more then that though, I love how people seem happier, and are more willing to help one another.   It's awesome!

This year, I have been lucky enough to be able to help others spread their own holiday cheer by creating their own custom Christmas Card designs.  These have been some of my favorite projects to date!  I love what I do, and I am excited to be able to share it with others!  

 Here are just a few examples of some designs available.


You can find these cards (and more!) at Puddle Design on Etsy.  If you don't see something you like, I would love to create a custom design for you, just like this one:


(Photos have been blurred for client protection.)


Have questions?  You can always email me at puddledesigns@gmail.com.  I'd love to answer any questions you may have!

Saturday 19 October 2013

Quick and Easy Lampshade Makeover


For the past 5 years I have had the most boring lamp shades staring at me while I sleep, and they are one of the first things that I see in the morning.  Kind of sounds like a bad horror movie, huh?  Obviously, something has been needing to change.

I have slowly been chipping away at some bedroom re-do projects, and this one has by far been the easiest!  All you need is an old lampshade, glue gun, and some ruffled trim.  Yup, that's it!

For these smaller sized lamp shades I needed about 4.5 yards of ruffled trim for each, but obviously depending on the size of your lamp shade you may need more or less.


How to:

Step 1:  Take your not so pretty lampshade and make marks with a pencil from the top to the bottom, one inch apart.  I did this a total of 4 times on each quarter of the lampshade.

Step 2:  Starting at the bottom mark, begin hot gluing your trim around the lamp shade one small section at a time.

Step 3:  Once you have returned to your starting point, cut the trim so that it slightly overlaps.  Then begin again on the next mark up.  Repeat process all the way up to the top of the lamp shade


You can be done at this point, or you could add some fabric flowers or any other embellishment of your choice.  My husband isn't a fan of lots of flowery stuff, so I decided to not add any flowers.  I still think it is a major improvement over the original!

Have you completed this project?  Let me know how it went!

Friday 18 October 2013

Totally Tutorials


Puddle Designs was just featured on the website Totally Tutorials!  Pretty exciting stuff!

If you haven't heard about Totally Tutorials, it is a family friendly blog that is a directory for a lot of different craft and sewing tutorials.  If you want to know how to do pretty much any DIY project, that is the place to go!  It is such a fun site.  You should check it out.  :)  

Friday 27 September 2013

DIY Large Letter Stencils


            I had some left over paint from my nightstand project, and I have wanted to make some artwork that matched.  I have seen this kind of artwork all of the place, and I wanted to create my own, but of course without paying a large price tag.  Thanks to an amazing sale on canvases at Michael's, I was able to get all the supplies I needed for this project for under $10!  Sweet!  Keep your eye out for sales and coupons.  I live by them!  For only the price of the four canvases I was able to make this artwork for my bedroom that perfectly matches my nightstands.  I love it! 

            In order to create the letter stencils I had to get a little creative, but in the end they were so easy!  And you can use any font that you want.  All you need is wax paper, a thin marker, and masking tape.  Everyone has those lying around their house, right?  Let's get started!


1.  Trace your letters using any font and size that you want onto separate pieces of wax paper.  (**hint** Make sure you don't make the lines too thick, because you don't want anything to accidentally transfer onto your canvas.  Or you could just cover the opposite side with tape...)

2.  Cover and fill in the letters with masking tape.  I had to clean up some of the edges by simply cutting them with scissors.  The nice thing was was that I didn't have to do anything to any of the long straight edges.  The curvier your font the more cutting you will have to do...

3.  Carefully peel the letters from the wax paper and place on the surface of your choice.  I placed mine directly onto my unpainted canvases.  

4.  Paint.  (**hint** Make sure before you paint that you rub down the edges really well to insure that no paint sneaks under the tape.)(**another hint** Paint in many small layers instead of laying the paint on really thick.)(**hint #3** He he, just kidding.  Paint away!)

5.  Let dry.

6.  Peel off stencil.  

It's that easy!


Have you completed this project?  Let me know how it went!

Tuesday 24 September 2013

Month-A-thon

Fitness has always been really important to me.  I was a competitive gymnast for 15 years and was even lucky enough to be able to do it at the college level.  Since my gymnastics career ended, I have been trying to find things to help me stay in shape.  But as many mom's out there know, sometimes fitting in a workout can be a challenge (unless you count all the lifting and running around after a busy 2 year old as a workout).  Sometimes I need a little motivation.

I recently found this wonderful organization that can help all you busy mom's (and any person for that matter) to either stay in shape, or even get you started on the path to becoming physically fit.  Plus, while you participate you are helping to support a good cause (the National Alliance on Mental Illness and/or Scout Troops 8 and 942).

The premise behind the Month-A-Thon is that by the end of the month you will have completed an entire marathon.  This isn't a marathon a week, or a marathon every two weeks, but 1 marathon a month, doing just a little each day.  I can do that!  Anyone can do that!

Check out their Facebook page, and get started today!


If you have any questions you can always contact Month-A-Thon at:  MonthAthon@gmail.com   


Saturday 14 September 2013

Owl Nursery Printables

"Star Light, star bright, first star I see tonight."  This adorable printable art set is now available!  

As with any of the designs at Puddle Designs, everything about this is customizable.  The colors of the owl can be changed to better match the color scheme of the room.  The sky can be lightened or darkened.  I can even add or take away stars if you want.  Just to name a few options.  

Any size is also available!  Print as 8x10's and display them in their own frame.    


Or print as 5x7's and display them all together in the same frame.  So many options!


Like 'em?  You can find them at Puddle Design on Etsy.  Thanks for stopping by!


Saturday 7 September 2013

DIY 3-D Decorative Letter

 I hate spending money on decorations!  I don't know how many times I have mentioned that, but I just cringe when I look at the prices on many home decorating items.  

Now, don't get me wrong, if I had unlimited funds, I would probably go out and buy everything Micheal's, Hobby Lobby, and that beautiful boutique down the street have to offer, but who has access to that kind of money, huh?  Ok, I can think of a few people, but that's not the point.  

For us little people, what are we supposed to do to make our homes feel like home?  Three simple little words:  Do. It. Yourself.  Yeah baby!  I love DIY projects.  


We had all these random boxes lying around, and I was having a hard time justifying throwing such nice boxes away (can you say "Hoarders!").  Lucky for me, lightning struck my brain, and I came up with this craft idea.  I have been wanting a big "R" for our wall, but have had the hardest time finding one that was big enough.  And then if I did, it was WAY more expensive than I wanted it to be.  So, I decided to make one... and here's what I did.


All you need for this project is:


cardboard boxes

razor blade
glue
jute twine


Step-By-Step Process


-  Free hand or print off any letter of your choice and transfer it to a piece of cardboard.  Make sure it is the size that you want.  Mine was about 1.5 feet tall, and completely free handed.


-  Cut out letter.  Using cut out letter as a stencil, trace additional letters on your cardboard boxes.


Here is my stencil, and some of the tracing. 


-  Cut out each additional letter.  *Be careful not to cut your carpet, or table...!*

-  Stack letters and glue together.  Clamp or place some heavy books on the letters while they dry.


After lots of cutting (and lots of mess in my living room), here are all the layers glues together.  It took 9 letters to get to my desired thickness of just over 1 inch.

-  When glue is dry, wrap with jute twine until entire letter is covered.  This step may take some time, so put on your favorite movie and wrap away!  


The final cost for this entire project was about $7, and that includes the silk flowers.  Not too shabby for a custom 1 1/2 foot tall 3D letter.


Have you completed this project?  Let me know how it went!  

Friday 30 August 2013

Cake for our little Angel

Our little angel.
August 27th is kind of a hard day for me and my family.  Three years ago on August 27th, my son Ethan passed away.  I was 8 months pregnant, and after not feeling him move for a day or so, I went to the hospital just to get things checked out.  At the hospital they were unable to find a heartbeat, and didn't see any movement on the ultrasounds.  I guess I don't need to give you all the details, but it goes without saying that that was the hardest day of my and my husbands life.

Everyone has their own beliefs about life after death, and the eternal nature of family relationships.  But we are members of the Church of Jesus Christ of Latter Day Saints, so we believe that familial relationships can continue beyond the grave.  I have always believed this, and it was this knowledge that helped us get through such an extremely difficult time.

Just because we don't get to raise our son right now, does not make him any less our son.  He is our son, and he will be our son forever.  This is what we celebrate each year on August 27th: the eternal nature of our family.

Even angel's need birthday cakes, so each year on Ethan's birthday I make Angel Food Cake for our family to enjoy.  It's just a simple and special way to remember our son.

The angel food cake recipe that I use is so wonderful!  So good in fact, that I just HAD to share it.  I don't really bake, so I went to Allrecipes.com to find a good recipe.  And I gotta tell ya, I kinda struck gold with this one!  I tried to find the original link to the recipe, but I printed it off a couple years ago, so I wasn't able to locate the original link.  Sorry.  I still have the hard copy I printed (thank goodness), so here is the recipe that I used:


HEAVENLY ANGEL FOOD CAKE

INGREDIENTS:

10 large eggs (or enough for 1 1/2 cups egg whites)
1 1/4 cups powdered sugar
1 cup flour
1 1/2 tsp. cream of tartar
1 1/2 tsp. vanilla extract
1/2 tsp. almond extract (I used just under 1/2 tsp. for lighter flavor)
1/4 tsp. salt
1 cup sugar

DIRECTIONS:
- Separate eggs into a measuring cup until the you reach 1 1/2 cups egg whites.
- Transfer to mixing bowl and let stand at room temperature for about 30 minutes (they fluff up faster when at room temp :)
- Meanwhile, stir together flour and powdered sugar with a fork (or sift together).  Set aside.
- Add cream of tarter, extracts and salt to the egg whites: beat on high speed.
- Gradually add sugar, beating until stiff peaks form
- Fold in flour mixture about a 1/4 cup at a time
- Gently spoon into an un-greased tube pan (or a bundt pan in my case)
- Cut through batter with a knife to remove any air pockets
- Bake at 350 degrees for 40-45 minutes or until cake springs back when lightly touched
- When baking is complete remove from oven and immediately invert pan.
- Cool completely before removing from pan.
- And of course the most important step... Enjoy!


We ate ours with fresh peaches and cream, but this would be equally (if not more) delicious with strawberries and vanilla ice cream.  Just sayin'.


Curious about what I believe?  I would love to answer your questions!  Watch this short video and visit mormon.org to learn more.


Monday 26 August 2013

Easy Cauliflower Soup with Homemade Wheat Bread

I have been feeling all sorts of domestic lately.  Maybe it's the rainy weather that brings the inner domestic diva out, I don't know.  For example, just the other day I cleaned the entire house, washed the dog, did all the laundry, cooked dinner, spent lots of time with my daughter and husband, and I even fit in a workout.  I mean, who does that all in one day?!  This weather must be doing weird stuff to me.

Anyway, back to the original purpose of this post...

I wanted to share some recipes with you that I used during one of my days of domestic-ness:  Homemade wheat bread, and Cauliflower soup.  Yummm!

The rainy weather has really made me crave soup.  Yes, it is still in the mid 90's outside even with the rain, but for some reason I think when it rains your are almost obligated to eat some kind of soup.  My poor husband is so patient with all of my crazy food ideas.  I guess this recipe will be perfect for the fall temperatures that should be coming soon...


Easy Cauliflower Soup

Ingredients
1 large head of cauliflower (broken into pieces)
1 large onion (chopped)
4 cups chicken broth
salt and pepper to taste

-  Put the cauliflower, onion, and chicken broth into a large stock pot and let simmer until cauliflower is soft (about 20-25 min).
-  Blend everything until smooth using a stick (immersion) blender or by transferring the contents of the pot to a regular blender.  (I'm not fancy enough to have an immersion blender, so I just used my cheapo regular plastic blender.  It worked great!!)
-  Return contents to pot, and season with salt and pepper.
  
Yup, that's it!  So easy.  We garnished our soup with some sharp cheddar cheese, and it was oh-so-delicious!!!  Easy, healthy, and delicious!


No soup is complete without some warm fresh bread.  And this soup paired perfectly with a whole wheat bread recipe I found by Kristin at Big Box Detox.

Saturday 24 August 2013

Personalized Family Subway Art Printable

I just recently had a friend move into a brand new home, and I wanted to create a special design for her and her family.  I am kind of a sucker for printables just because they are so dang easy to print and can easily be made into a special and personalized gift.  That's probably why I make so many of them.  It's a surprise that I don't have my house covered from wall to wall with printables...  I just love em'!

Everything about this design is customizable.  And, let's be totally honest, pretty much everything at Puddle Designs is customizable.  I am very easy going, so if you see a design you like, but there is something about it that you would like changed, all you have to do is ask, and presto!

Anywho, back to this printable.  The colors can be changed, the fonts can be changed, even the words can be changed to better fit your family's personality.  A photo of your family could even be used as a backdrop to the subway art if you like.  So many options!


Like it?  You can find it at Puddle Design on Etsy.


Thanks for stopping by!


Saturday 17 August 2013

DIY Vintage Crates

I have been wanting some vintage looking crates that I could use for photography props.  I looked and looked everywhere online, and I couldn't find anything that was in my price range ($10-$20).  I am a cheapskate, so I HATE spending money.  I wasn't willing to fork over $40 for a crate, just because it said "Coca-Cola" on the side.  So lame!  So, what was a girl like me to do?  Create my own!

I found these really cute and simple crates at a couple of local craft stores.  Thanks to coupons, I was able to get them for screaming deals!  The smaller one I got at Michael's with my 40% off coupon for $4.59 (after coupon).  The larger one I got at Joanne's with a 50% off coupon for $6.54 (after coupon).  That's just over $11 for two wooden crates!!  Saaweeeett!!  Good news for a frugal girl like me.


Now to the problem of staining them.  I was afraid that if I used real wood stain that the finish would not look as vintage as I wanted.  Plus I didn't want to buy a large can of it, if I was only going to be using it to stain two small crates (I am such a cheap-o).  I had heard of people using coffee grounds to stain wood, so I thought I would give that a try...

Here are the ingredients for the do-it-yourself-homemade-all natural-wood-stain:  vinegar, coffee grounds, and steel wool.  Surprised?  I sure was.  Honestly, I was a little skeptical going into this, but thought in my head "coffee is dark, so I guess I could see why that might work."  You should have seen the look on the hubs face when I told him what I was doing.  Priceless!  He thought I was crazy.


Two of the ingredients were easy to come by in my house: vinegar and steel wool.  But for a non-coffee drinker like myself, where was I going to get some coffee grounds?  Well, what's the first place you think of when you think of a good ol' cup a joe?  Yup.  Starbucks!!!  So away I went.  I think that the ladies behind the counter thought that I was crazy when I asked them for their used coffee grounds.  A few years ago I would have been so embarrassed, but now I just think its funny.  Think what you want, people!  (Maybe I am slightly crazy...)


 I mixed up about a quarter cup of coffee grounds, an apple cider/regular vinegar combination, and the steel wool pad (cut in half) in a regular sized mason jar.  After about 10 hours of letting it rest, my patience ran out and I decided it was time to stain (leaving it overnight might have been better...)


 Here is what the crate looked like after only one coat of the stain.  The crate on the left is the original wood, and the one on the right has the stain.  I was a little worried at this point.  How many coats was I going to need to put on in order for it to be as dark as I wanted?


Here is the same crate after a second coat.  Not tons darker, but getting there.  After this, I decided to stop and just see if they got any darker as they dried.  


 Here's a helpful hint: you can use the steel wool as a paintbrush, and just rub the stain on with that.  It worked great!  Unfortunately, I don't think my brain was properly attached, and I didn't wear cloves.  If you ever decide to stain wood this way, I have a couple words of advice:  WEAR GLOVES!!  My hands were stained like this for days.


I let the crates sit outside overnight to dry, and the next morning, to my surprise the crates had darkened up considerably!  I had to do a little patch work over some spots that I missed the first time around, but in the end they turned out beautifully!!  Don't you think? 

 It helps that there is the cutest toddler in the world playing Vanna White for me :)


The grand total for this project (drum role please...):  $11.13!!!!  Awesome!
Who knew that coffee, vinegar, and steel wool could create these beauties!  I am so excited to use them! 

Saturday 10 August 2013

Dinosaur Printables

Here are some more printables coming your way!

The inspiration behind this design is my cute little nephew Landon (if that wasn't obvious by the name included in the design :) ).  He is now the proud brother of not one, but two little brothers!  I can't believe it!

I know that he has to share a room with one of his brothers now, so I designed these with the idea that he could have his name on one dinosaur, and younger bro could have his name on another.  Plus, what 5 year old little boy does not love dinosaurs.  Am I right?

I hope you like these as much as I do!


The colors of each dinosaur are totally interchangeable.  You can have a pink T-Rex if you wanted!  You also don't need to include any birth information.  You could put a quote there, or stats of the dinosaur, or nothing at all.  The sky's the limit!
  
Love 'em?  Find them at Puddle Design on Etsy.


Friday 26 July 2013

Painting Don'ts

Life is full of don'ts: 

Don't pick your nose.

Don't use your sister's hair as a paintbrush.

Don't eat that gum off the sidewalk.

We've heard them all.  Well, most of them...  

When it comes to painting furniture, there are plenty of other don'ts that I had no idea about.  I wish that someone had told me these don'ts before I started my most recent project.  It would have saved me a lot of time and frustration.  Experience is a pretty brutal teacher.

So, to save you the heart ache and hair pulling, I have compiled a list of don'ts for you to keep in mind.  
These will probably reveal my relative inexperience when it come to re-painting furniture, but you gotta start somewhere.  Right?


-  Don't don't prep your surface for painting (did you get that?).  Always strip and sand if you want it to look good!

-  Don't sand everything by hand.  It is possible to do it this way, but very tedious.  My new favorite toy is my hand sander.  Without that baby, my hands would be very hot and tired right now.

-  Don't think that you have to get every itty bitty piece of old paint and finish off of your project before you paint.  (Unless you are planning on using a stain instead of a paint... In that case, sand away my friend!)   

-  Don't paint at night in your dim garage.  It's impossible to see how even the paint is going on.

-  Don't paint at night when all the bugs come out and fly into your paint and all over your freshly painted project.  Nasty!  And such a pain.

-  Don't use cheap brushes to paint large surfaces, use a roller.  But...

-  Don't buy the first roller you see and think that all rollers are the same.  Each roller leaves a different finish.

-  Don't paint outside when it is a bajillion degrees.

-  Don't paint outside when it's humid.   Humidity effects the way that the paint dries and adheres to the wood.

-  Don't paint outside when it is both humid and hot.  Eww!  For that matter, don't go outside at all when it's like that.

-  Don't think that you are good enough to freehand straight edges.  Tape can be your best friend.

-  Don't be a perfectionist (like me).  Things take ten times longer.

-  Don't have a ridiculously adorable daughter that wants to "help" you all the time.  Well, actually this one shouldn't really be a don't, because it's important to have those kiddos.  Just make sure that you have the patience and the time to do a project with a little "helper".

Phew!  Can you tell that this project was quite an adventure for me?  I hope that you are able to learn from my many, many mistakes and not make the same mistakes yourself.    

Even with all of the sanding and re-doing, the entire project cost me less than $20, and that includes new drawer handles.  Not too shabby!! 

from drab
.
.
.
.
.
to fab!!


 The drawers were my favorite part, so of course I had to include a close up.  :-)  I Mod Podged regular scrapbook paper onto each drawer.  It added such a nice special touch!  I may or may not be in love with these... even with all the painting drama.


Tuesday 16 July 2013

Printable Bathroom Owls

I created these Bathroom Owls for Cassi at My Newfangledness.  Not only is she my sister-in-law, but she is a super talented seamstress, and crafter extraordinaire!  You should check out her blog.  She's pretty awesome!

So, we all have her to thank for this design!  It's one of the most popular items in the shop.  


I get a lot of requests to change the colors, because lets be honest, how many people have those exact colors in their bathroom decor.  Am I right?  I even had someone send me pictures of some of their decor items, and asked if I would make the owls to match.  Such an ingenious idea!  Here are the altered owls with the decor to match.  (I think I may like them more than the originals... sorry Cassi.)    


Any printable can be created to perfectly match the decor in whatever room you are decorating.  Just send me a picture, and I will create the printable art to match!  It's that easy!

You can find the printable bathroom owls here in the shop today!

Thanks for stopping by!


Monday 15 July 2013

Baby in a Bowl

I have a project in the works, but it takes so dang long to complete projects when you work on them outside and you feel like you are in an oven.  Where I live it gets HOT!!!  Like over 110 degrees hot.  So I try not to spend any unnecessary time outside (wouldn't you?!).  Most of the time I get my work done at night, but some days I am so exhausted from chasing my daughter around that I just don't want to sand furniture.  That isn't my favorite way to wind down at night :).  So, long story short, this project is taking f.o.r.e.v.e.r!  

While we wait, I wanted to share a quick picture with you all.  This is my little muchkin.  She has got to have one of the goofiest personalities, ever!  I quickly snapped this picture one day while she was watching tv.  Sometimes you just need to watch tv in only a diaper, and in a bowl...  At least she sees it that way.  I prefer the couch.
  

Friday 5 July 2013

Chocolate Chip Cookies


My mom is pretty much the best cook in the world.  I know a lot of people say that about their moms, but seriously, Mama Puddle is THE best!  No matter how hard I try, my food never tastes as good as hers.   Even if I follow her recipe exactly, it just doesn't taste the same.  So, in some instances I have stopped trying to recreate her recipe, and use one of my own.  Exhibit A: this cookie recipe.  I feel like I am betraying my mom by even using something else, but I know I will never be as good as her in the kitchen.  This chocolate chip cookie recipe is pretty dang close to the deliciousness that comes out of Mama Puddle's kitchen, without actually coming out of her kitchen.

I hope you enjoy this recipe as much as me and my husband do.  We always make a huge batch, then roll any leftover dough in wax paper, and store it in the freezer.  When we are craving something sweet (which happens quite often) we can cut off as many cookies as we want to eat and just bake those few.  It's awesome!  I looooove fresh baked cookies, and a nice refreshing glass of milk.  Mmmmm...  What's your favorite go-to dessert?


Ingredients:

1 cup butter (softened)
1 cup brown sugar (packed)
3/4 cup granulated sugar
2 eggs
1 tablespoon real vanilla extract
3 cups all-purpose flour
1 1/2 tsp salt
1 1/4 tsp baking soda
1/2 tsp baking powder
2 cups semi-sweet chocolate chips


How to:

1.  Preheat oven to 300 degrees.

2.  In a large mixing bowl, cream together butter, sugars, eggs and vanilla.

3.  In another bowl, mix together the flour, salt, baking soda, and baking powder.

4.  Add dry ingredients to wet ingredients

5.  Stir in chocolate chips

6.  Spoon about golf ball sized balls of dough, 2 inches apart, on a un-greased baking sheet.

7.  Bake for 20-22 minutes until a couple of cookies start to show slight browning around the edges.

8.  Let cool on a rack for 5-10 minutes.  Eat while still warm for a party in your mouth!  :)


Tuesday 25 June 2013

Monster Boy Bathroom

I get lots of requests from family members asking if I could create a specific printible or other design for them.  And I love it!  It is so amazing having such a supportive family!

These monster printables were created for my sister-in-law and her adorable little boy.  She wanted to do a monster themed bathroom for him, because he loves all things monsters!  Plus, what kid doesn't need reminders about these things!


You can find these printables here in the shop today!

Or, do you have a theme in mind, but can't find the printable you need?  Let me create one just for you!  Send me a message, I'd love to help!

Wednesday 12 June 2013

DIY 3-D Star


I have been wanting one of those really-cool-vintage looking-3D-stars for such a long time!  But $25 is way too much for me to spend on one of them (I am such a cheap-o).  I looked all over the internet (and when I say internet, what I really mean is Pinterest :-), and I could not find any instructions for a big star.  There were tons of ideas on how to create the little teeny tiny ones, but I wanted a BIG one!  I finally decided that I needed to get off my lazy bum and just figure out how to make one myself.  Now, I get to share my new found knowledge with you!  Lucky.

Here's what you'll need:

3 Cereal Boxes
Scissors
Ruler
Hot Glue Gun
Hot Glue
Paint (I used the cheapest I could find - surprised?)


Here's what you do:
These first few steps (1-5) are what you need to do to make the stencil.  They only have to be done once!

Step 1-  Open each of the cereal boxes so that they lie flat.  The face and back of each of my boxes was about 11.75" x 7.5" (not including the sides), but really you could use any size that you want.

Step 2-  On one of the boxes, measure half-way across the top and the bottom (on mine it was 3.75" in).  Make a mark at each half-way point.  Now draw a line from mark to mark.

Step 3-  From the bottom of the box measure up 4 inches on each side and create another mark.  Connect those two new dots.  You should now have a cross drawn on your box.

Step 4-  On that shorter line that you just drew, measure in towards the center of the box 1" from each side.  Again, make a mark at each of those spots.

Step 5-  Draw four new lines connecting the top and bottom marks to each of these new marks.  Now it should look like you have a kite drawn on your box.

Have I lost you yet?  Here's a photo to help.  (Sorry about the poor quality, it was taken with my phone...)  


Phew!  Are you still with me?  Don't worry, the rest of the process is easy peazy!

Step 6-  Cut out the "kite" shape along the last lines you made (labeled step 5 in the photo above).

Step 7-  Using this kite shape as a guide, trace 5 more of the same shape, using both the front and back of each of your cereal boxes.

Step 8-  *Make sure you read this entire step before you begin cutting*.  Cut out each of the shapes, making sure that you leave between a quarter inch or half inch "seam allowance" along the shorter lines.  Unlike in step 6 you will NOT be cutting directly on those shorter lines.  You will be cutting a quarter of an inch outside the lines.  This buffer will be where you will be gluing, so it is super important.  The longer lines, however, you will be cutting directly on (the outer points of the star).

Here is what the completed cutouts should look like:


Step 9-  Now take your ruler and scissors, and score each piece right in the center from top to bottom (on the line labeled "step 2").  Make sure you do not cut all the way through the cereal box, you're just making a shallow cut.  *Hint* Score the side of the cereal box that you want to be on the BACK of the star (the side you don't want to paint).  


Step 10-  Take each piece and slightly bend in along the line you scored.  You will be bending it so that the cut is on the inside of the bend.  In the same direction you bent the scored line, also bend along the shorter lines that you traced (next to the "seam allowance").  These shorter pieces you want to bend 90 degrees.

Step 11-  Now, glue each piece together - seam allowance to seam allowance.  Don't freak out when you have all of them glued together and you star looks like this:
I may or may not have had a minor freak out moment, just saying.   Take a deep breath and just glue the final seams together.  Voila!  You have a beautiful 3D star, ready for paint!

Step 12-  Paint using any paint of your choice.  I first painted the entire star a light brown.  And once that dried the real fun began.  I wanted a little bit of an antique look, so I used glue as a second base coat.  Then after it had dried a little bit (not too much though) I painted on the acrylic paint.  The glue kind of makes the top coat of paint crackle.  In short, glue became a cheap substitute for crackle paint.  Sweet!!!!  And it looks great!  If you have any questions about this painting process, just send me a message, and I'll help you out.  

Metalic paint would probably look pretty cool too.  Use your imagination!  Make the star your own! 

Step 13-  In order to get the star hang-able I glued a popsicle stick on the back, then looped a rubber band around the stick.  You could probably come up with better ways than that, that's just what I did.  Worked like a charm though!  


Here is the final price breakdown.  The only thing that I had to buy in order to complete this project was paint.  I bought three small bottles of acrylic paint for a total of $2.11!  That's it!  The cost may even be lower for you, if you already have paint lying around the house!  Way better then spending $24.99 on Ebay, am I right?


Have you completed this project?  Let me know how it went!  


Saturday 8 June 2013

Minnie Mouse Party

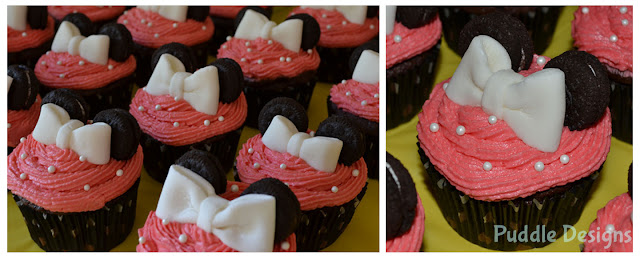
My little munchkin recently turned one, and she is totally obsessed with Mickey and Minnie Mouse.  So naturally we had to have a Minnie Mouse themed party for her.  It was fun letting the inner party planner in me come out and go wild!  

I made all of the cakes, cupcakes, and decorations by hand, in order to keep cost down as much as possible.  My inner baker was able to come out and play too :-). 


All of the bows were made out of homemade fondant.  All it was was marshmallows and powdered sugar!  So easy, and tasted way better than the regular plastic flavored fondant.


These designs and more are available at Puddle Design on Etsy!

Monday 3 June 2013

Giraffe Bookshelf


For some reason, having kids made me more crafty.  

Does that make any sense at all?  

I guess I just want them to have cute decorations for their rooms.  And because I'm so cheap, I figure it is better to make it myself than buy it from a store...

This was one of the very first projects that the hubs and I created for our little munchkin's nursery.  
Doing projects that involve paint and paint stripper are hard (almost impossible) to do safely while pregnant, so I couldn't do it alone.  The paint stripper that we used was the no fume stuff, and it was a beast to get all that dang paint off!!  It's a good thing I have a rock star husband that was willing to do most of the work on this one :)

When it came time to painting this little shelf, I knew exactly what I wanted to do.  I have this strange addiction to giraffe's, so I knew when our daughter was born that I wanted a giraffe nursery.  And since I am not an artist, I knew that painting giraffe skin was a no go.  Instead of paint, we covered the back of the bookshelf with giraffe print fabric.  So easy, and I love the way it turned out!


Related Posts Plugin for WordPress, Blogger...